Showing posts with label chef lexi. Show all posts

Wednesday, October 30, 2013

red velvet cheesecake cupcakes!


I've been meaning to post these for ages now, as I made them a month ago for Steve's birthday. Red velvet cheesecake cupcakes! They were amazing!


I posted the recipe to Scarlet Threads blog yesterday, so go have a look!


Monday, August 26, 2013

three ingredient Nutella cookies!


Recently, I saw a recipe on pinterest for three-ingredient Nutella cookies, and I was intrigued. I knew I had to make them. It must have been fate, because when I was grocery shopping, Nutella was on sale! It's never on sale! 


Yes, I take photos at the grocery store...is this weird?! Probably. 


Anyway, back to the cookies.


It's a very simple recipe; flour, Nutella and an egg. I pulled out my mixer and mixed away. You'll need one cup each of the flour and the Nutella, and then an egg. Blend them together. The dough was very crumbly, and wouldn't hold together well at all, so I added a few dashes of vanilla, to juice them up a bit. 


I guess they're now four ingredient Nutella cookies? 


The recipe I followed (linked here) says to bake them for 7-8 minutes, but I found that they needed closer to 10 or even 12 minutes. That could be due to my adding the vanilla...


Also, the recipe just made about a dozen cookies...interestingly enough, one cup of Nutella is just about one jar....so, if you have many people to share with, I'd double, or even triple the recipe, to be sure you have enough! Or, make them smaller? Mine aren't that large though, I don't think! 


Here is the finished result:


They were very dense, but delicious! I'd suggest eating them with a tall glass of milk! 


Baking anything new this week? 


Also, I've posted this recipe to Scarlet Threads blog today too, Check them out for lots of great recipes for all sorts of things! 

Thursday, April 25, 2013

pinterest baking fail.


If you're on pinterest, I'm sure you've seen the recipe for the fresh strawberry yogurt bundt cake that has been all the rage. I think I've repinned it about a dozen times from a dozen different blogs....each time I saw it, it was a different photo of course, from a different blogger, so I just kept on repinning! Sunday afternoon I decided to try it. I had a container of Greek yogurt, and a container of  strawberries that needed to be used. Usually I gobble up the berries as soon as I get home, so I am not sure how these stayed in the fridge for a few days this time! I looked back to pinterest and found my most recent pin (ha!) and grabbed an apron and set off to bake.


This darling apron is the Lucy from Scarlet Threads. She's now retired, but there are a few others in this same style in the shop! Remember, if you make a purchase, use the coupon code lex25 for a discount on your purchase!
 
 
Normally when I cook and bake, I follow the recipe for the most part, but improvise here and there. This time, I followed it nearly exactly, with one main switch. The recipe called for lemon zest, and I realized too late that I didn't have any lemons, but I had a jar of lemon zest, so I used that instead. Not a huge change, I didn't think.
 
 
However, look at my cake---


This is not pretty, and does not look delightful. It is delicious, but far from appetizing looking! The recipe calls for a glaze on top, but I didn't do that in the end, because it just wasn't looking good. All of the photos I've seen of this cake are gorgeous - light colored cake where you can see the strawberry pieces baked inside! I have no idea where I went wrong! 


When I poured the batter into the pan, it filled it at least 3/4 of the way up, and when it baked, it baked up and over the top a bit! At one point, I heard a pop from the oven, and realized that there had been some sort of heat bubble inside that exploded, and a blurb of batter splurted over the top of it, making almost like a crust over the top, while still in the oven! So perhaps I'd have to cut the recipe in half next time? In this case, it is supposed to bake for an hour, but after just over an hour, it wasn't quite done yet.


As I said, it does still taste good, but just doesn't look good. I almost didn't want to post about it, but I figure that not every recipe is perfect every time, right? Mistakes happen, and that is how we get better in the kitchen, eh? 


Have you had any baking fails recently?


Friday, October 12, 2012

new recipe, taco pasta bake


So! The other day, I posted about menu planning for the week, and so far, I am ahead of my game! I made the taco pasta bake, and it came out really well! I'm even posting it in the same week that I made it!
 
 
Steve really enjoyed it, and we had some leftovers for the next night, which was really nice. I will admit, I'm not always very good about eating leftovers...but, this time, we did!
 
 
I found the Taco Pasta Bake from a foodie blog called Iowa Girl Eats. She has some great recipes- this wasn't the first I tried, but the first I am sharing, I think. Kristin's photos are much nicer than mine are, and far more colorful, but mine still tastes quite good!
As always, I didn't follow the directions to the letter- I rarely do that when it comes to recipes. I like to mix them up a bit, to make them my own. Of course, there are sometimes items in some recipes that I don't like (example, mushrooms. blech!), so I omit things like that. Steve is also pretty picky, so I will remove things that I know that he won't like either, such as peppers. He's a bit weird  ;)
I didn't take step by step photos this time, but this is the finished dish.


Taco Pasta Bake

Ingredients:
1lb ground beef
1 small onion, chopped
1/2 cup water
1 recipe homemade taco seasoning + 1/2 teaspoon salt
14.5oz can tomato sauce
14.5oz can petite diced tomatoes
few dashes hot sauce
2 cups shredded cheddar cheese, divided
1 1/2 cups corn kernels (frozen, fresh, or canned)
4oz can chopped green chilies
8oz macaroni shells, cooked and drained
2 cups crushed tortilla chips
Toppings: chopped tomatoes, salsa, sliced olives, green onions, sour cream
Directions:
1. Cook ground beef and onion in a large skillet over medium-high heat until no longer pink. Drain, then return to the skillet. Add water, homemade taco seasoning, salt, tomato sauce, petite diced tomatoes, and hot sauce then stir to combine. Turn heat down to medium low and simmer for 10 minutes. Meanwhile cook macaroni shells in salted, boiling water until just under al dente, then drain and set aside. Preheat oven to 350*
2. Turn stove off then add 1 1/2 cups cheddar cheese to the tomato mixture and stir until smooth. Add corn, chilies, and cooked shells, then stir to combine. Pour mixture into a non-stick sprayed 8×8 baking dish and bake for 10 minutes. Top with crushed tortilla chips and remaining cheese then bake for 10 more minutes. Serve with toppings, if desired.


My notes/edits:

I did not use an onion. Another thing I dislike!

I used whole stewed tomatos in Mexican spices.

I didn't make my own taco seasoning, but used a package of pre-made. Someday, I will try making my own- I keep hearing how much better for you it is!

I didn't use the green chilies.

I baked in a 9x13 pan.

I forgot to buy sour cream, so didn't have that as a topping. So sad. I did buy salsa, but forgot to use it. Ooops. Next time, I'll try with both, along with black olives. YUM!

I did top with tortilla chips and cheese for the final ten minutes of baking. So good!


It tastes better than it looks, I promise!


We loved it! Such a great dinner.


What are you cooking up this week?  Anything amazing that I should try?


Monday, October 8, 2012

menu planning


With this many cookbooks, you'd think that I'd never run out of dinner ideas.....


 Though perhaps I have too many, and feel intimidated? Yes, that must be it. Of course, now with the development of pinterest, I find myself constantly pinning recipes to try, and I have tried a good number of them too, which is encouraging  ;)
 
 
I really need to be better about planning meals for the week. I admit, that I think about it, but then not much comes of it. Occasionally, I plan ahead, but most of the time, I wing it, and when I get home around 6:30 or 7pm, I look through the fridge and decide at that moment what to make.
 
 
This week, I am attempting to plan ahead for the week. I have three pins that I will attempt. By attempt, I mean that I will try to keep to my "schedule" and make them, rather than leave it to the last minute like most of the time! Wish me luck!


I'm just planning for three recipes for the moment....as Friday night we may go out, and with having Monday off, I will likely throw something in the crockpot in the morning (maybe a pork tenderloin?), and go from there! I'll have to report back next week on how they all turn out for me, and if I stick to these plans  :)


What about you? Do you plan your meals each week? Do you have any tips for me on how I can plan better and then stick to my plans?!


Tuesday, June 12, 2012

lentil soup!


Last weekend, I made lentil soup!  For several days, I'd been thinking about it, for some reason. Do you ever get an idea in your head, and then not be able to focus on anything else until you've done that? No? Just me? Oh dear...  ;)   Well, this time, it was lentil soup. I found a recipe that sounded terrific, and my decision was made for me. I went out to get the things I'd need, though some of them I already had. Apparently I had thought about making this earlier, because there were two unopened bags of lentils in my pantry! 


The recipe called for chopped onions, celery, and shredded carrots. I admit, I don't like onions much- I like them cooked in things, but not on their own, and NOT raw! I found this Mirepoix at Trader Joe's, which was a container with chopped carrots, onions, and celery, and the perfect amount of each! The best part? I think it was $2.49, which is less than it would have been if I had bought all three individually! 


As I went to open this package of sausage, I realized that its best buy date was well past the date I was cooking with it. The package was still sealed, but had been in the fridge, not freezer, so I was hesitant to use it. I had some kielbasa in the freezer, so I used that instead. 


First up, crumble the kielbasa in the bottom of a pot, with some olive oil. Brown it up, and once it has cooked, remove from the pan.


Add the veggies to the pan, let them cook through, stirring as needed. Add minced garlic. The recipe I used called for cumin and red chili flakes. As I was cooking, I realized I was out of both. Oooops. I used black pepper and maybe something else. Now I don't remember, hehe! 


Add the kielbasa (or sausage!) back to the pot, and add the chicken stock. After rinsing the lentils, add those to the pot too. 


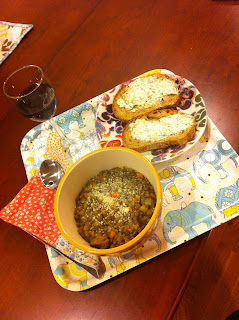
Let the pot simmer at low, uncovered, for about 45 minutes and soon, your lentil soup will look like this-


Pour yourself a glass of wine, butter a piece of bread or two, and add a generous sprinkle of parmesan cheese to your bowl of lentil soup, and then sit back and enjoy a really delicious dinner!



~~~~~~~~~~~~~~~~~~~~~~~~~~~~~~~~~~~~~~~~~~~~~


Spicy Chicken Sausage and Lentil Soup
makes a big pot of soup.  serves 8
2 tablespoons olive oil
1 pound spicy chicken sausage, uncased
1 medium yellow onion, finely diced
3 celery stalks, finely diced
2 carrots, finely diced
2 cloves garlic, minced
2 teaspoons dried ground cumin
1/4 teaspoon red chili flakes
2 cups uncooked French lentils, rinsed
8 cups chicken stock
salt and pepper to taste
parmesan cheese, olive oil, and bread to serve
In a large saucepan over medium heat, warm olive oil.  Add the uncased chicken sausage and cook, breaking up with a spatula as it cooks.  Sausage should finish cooking in small chunks.  Remove from pan.
Add a touch more olive oil if necessary.  Add onions, celery, and carrots.  Cook until the onions are transluscent, about five to seven minutes.  Stir occasionally.  
Add the garlic, cumin, and chili flakes, and cook for one minute more.
Add the sausage back to the pan.  Stir to incorporate.  Add the lentils and chicken stock.  Reduce the heat to low and simmer the soup, uncovered, until the lentils are tender, about 45 minutes.
Serve soup with a generous sprinkling of parmesan cheese, a drizzle of olive oil, and good crusty bread.  Soup will last, in an airtight container in the fridge, for up to 5 days.  Soup also freezes well.
~~~~~~~~~~~~~~~~~~~~~~~~~


I don't have eight people living in my house, but I had enough to last me most of the week! Yes, I ate the same thing for dinner four nights in a row...what of it?! This wasn't a bad thing! Steve was away last week, so it was just me. You could certainly skip the sausage if you are not a meat eater, or add spices for variety (curry, anyone?!). Lentil soup is so versatile, and so comforting, I think. Despite it being June, and so hot here in Washington, DC, I do love soup for dinner! The funniest thing about this, was that my mother made lentil soup the same night! We had no idea that the other was making it, until we spoke that night after dinner! Too funny!


What is your favorite soup to eat? To make? 


I've posted this at Scarlet Threads blog today too! Stop by there!


Wednesday, April 18, 2012

can this!


Last Friday, I ordered this book. To my surprise, it arrived with Monday's mail! I've been wanting to try canning, and this book seems terrific. I opened it, and the first recipe I saw was for strawberry and lavender jam. LOVE. I love lavender. I love strawberry. LOVE.
My mother used to make jam and applesauce, and I think this will be a really fun project. I've also found some great looking recipes on pinterest.
I'll report back on what I make, and of course, I'll be sporting a Scarlet Threads apron :)


Have you tried canning? What are your favorite recipes?

Tuesday, March 27, 2012

Tasty Tuesday! Mexican stuffed shells.


I saw this recipe on pinterest a few weeks ago and knew that Steve would love it. Mexican stuffed shells! Anything with cheese, and he's a happy man.

I would have made it sooner, but discovered that jumbo pasta shells are not too common at grocery stores in DC! I looked at half a dozen, I think, and never saw them, until this past weekend. Oddly enough, I was at a store that I rarely go to, because I find it so disorganized, yet they had the jumbo shells I needed! So, win!

Here is the original recipe, found at a blog called The Way to His Heart. Cute name, eh?


Mexican Stuffed Shells

Ingredients:

1 lb. ground beef
1 package low-sodium taco seasoning (or better yet use this Taco Seasoning!)
4 oz. cream cheese
14-16 jumbo pasta shells
1.5 cup salsa
1 cup taco sauce (This is a smooth, tomato based sauce found in the Mexican section)
1 cup cheddar cheese
1 cup monterey jack cheese
3 green onions
Sour cream

Preheat oven to 350°.

In a frying pan cook ground beef; add taco seasoning and prepare according to package directions. Add cream cheese, cover and simmer until cheese is melted. Blend well. Set aside and cool completely. While ground beef is cooking, cook the pasta shells according to directions; drain. Set shells out individually on cutting board/baking sheet so that they don’t stick together.

Pour salsa on bottom of 9×13 baking dish. Stuff each shell with the meat mixture. Place shells in 9×13 pan open side up. Cover shells with taco sauce. Cover with foil and bake for 30 minutes.

After 30 minutes, add shredded cheese and bake for 10-15 more minutes, with the foil removed. Top with any condiments you’d like (green onions, black olives, etc.) Serve with sour cream and/or more salsa.

My edits:

First, I used ground turkey instead of beef.

I used the entire block of cream cheese, so 8 oz, instead of half of it. It made it super creamy!

I forgot to buy the green onions.

The shells get slippery and are hard to fill. I used a ladle to help keep their shape while filling them!

You can see from my photo that I baked them in a round dish, I think it's nine inches. It's Boleslawiec, a Polish pottery that I collect. It has handles!

I also didn't pour the taco sauce over them before baking- I just used salsa in the dish, and placed the stuffed shells over the salsa. I baked them for about 20 min, then took the foil off, and sprinkled the cheese over them, baking for another five or eight minutes.

They were delicious, Steve was a big fan!


Hmmm, it doesn't look as pretty in the pictures, but I feel like most pasta/cheesey dishes don't photograph well! I guess I should work on my food photography skills, eh?

I posted this at Scarlet Threads blog today too.

What are you cooking this week? Do you have a recipe that you want to share with Scarlet Threads readers?
We love finding new recipes to post!

Also, speaking of Scarlet Threads, have you seen their new line of jewelry? It's a new partnership with a Ugandan organization that works with women and children, and we're so thrilled to be working with them. Keep an eye out, I think there may be a giveaway coming up ;)


Wednesday, January 18, 2012

a pinterestly delicious meal!

Here comes another recipe, first found on pinterest, of course! I saw someone's pin and thought it sounded like something fun, and a little different. I love lasagna, but it's just so filling, so these bite-ish sized pieces seemed perfect! I thought they'd be a hit with the boyfriend too.

This is the original recipe that I followed, for the most part.

Lasagna Cupcakes

One cup of your favorite pasta sauce
1 lb hamburger meat
18 wonton wrappers
(note- I couldn't find wonton wrappers. I bought rice paper wrappers.
They DID NOT work. In the end, I used tortillas that I ripped into pieces).
8 ounces mozzarella cheese , grated
(note- I bought a tub of mozz balls and used one in each cupcake!)
3 ounces parmesan cheese , grated
4 ounces ricotta cheese

    Preheat oven to 375* and spray 6 serving muffin tin with Pam (I did all 12, haha)
    Cook hamburger meat, season to taste, drain.
    Assemble the lasagnas by lining the muffin tins with pieces of torn tortilla. I started with a dab of ricotta first, and then a mozzarella cheese ball and then a scoop of meat and spoonful of sauce. Then, a sprinkle of parmesan cheese on top of it all. I didn't follow this rule each time...I got a little wild and mixed up the order of some of the layers each time ;)
    Bake until the lasagnas are nicely browned, about 20 minutes.
    Let cool in the pan for about 5 minutes, then run a knife around the edges and remove from pan.


    Ready to bake!


    Baked!!!


    READY!!!


    All in all, these were really delicious, and easy to make. You could certainly add other things if you wanted, like peppers or black olives or something else. Next time I make them, I may use a bit more sauce, as I like my pasta extra saucy. Also, maybe other kinds of cheese? More spices? Who knows! The possibilities are endless!


    What's cooking in your kitchen this week???

    Monday, December 12, 2011

    cookie swap 2011!

    Last Sunday I hosted my third annual holiday cookie swap! It was started a few years ago by my dear friend Christine and I. It was held for two years, and then last year, it was skipped for a variety of reasons, but I brought it back this year, and hope it will continue for many years to come! When I was a little girl, my mother always went to cookie swaps- she'd bake many dozen cookies, and then come home with the same amount in a variety of cookies, though I didn't think that any of us needed many dozen....so, just a few were swapped, and that was fine!


    Before the party though, Steve and I had to get our tree up!

    Our naked tree here, though now it is decorated! Note the lovely Scarlet Threads tree skirt, called the Noelle! Now out of stock, though there are a few Genevieve's left!


    Steve sets up the water bowl for the tree....


    See this little bear? She was given to me by my first grade teacher, Mrs. Sirna, many years ago, and she is hung on my tree each year still!


    (I'll have to do another post later, about favorite ornaments!)

    Now, it is nearly cookie time! I made a white chocolate cherry chip cookie...I saw the recipe on pinterest, and they were SO good! I am actually making them again tomorrow for a bake-off at work! Yikes, the competition will be fierce!

    Here is the batter!


    Here are the cookies, ready to be swapped!


    Let the swapping begin!


    Heidi has a plateful of deliciousness (and blogged about it last week!)


    My finished cookies!


    Steve and I. He wasn't really a guest, but since he lives here too, I suppose it was okay that he came downstairs for a snack ;)


    Thanks to the ladies who were able to come, it was so much fun!


    Do you have any holiday party traditions that you take part in?


    Monday, October 24, 2011

    Pampered Chef!

    I hosted my first ever Pampered Chef party on Saturday! I've been a fan of PC products for a while now, as my mother has parties and sends me things as gifts, and I've had other friends have parties, but I had never actually attended one! Whenever I was invited to one, it was always in another city, so I'd order things online instead. I figured it was about time to host my own, so I found a local consultant.


    I do have a few more pics of the party, which I will post later, but here is what I am totally obsessing over-


    For some reason, I don't own a bundt pan and have been really wanting one lately, so this will be my number one purchase! The stoneware is all so wonderful too, such great quality.


    There are a few other things I'd like, so we will see, but I know this will come live at my house soon! One of my friends booked a party from mine, so I will go to hers in a few weeks, and maybe buy a few more things ;)


    Do you have any Pampered Chef products? What is your favorite?

    Anything that I can't live without?


    FYI- my PC party closes TOMORROW night, so if you are at all interested in making a purchase, let me know and I will send you the info! Right now, the unglazed stoneware is 20%, which is a great deal!

    Tuesday, October 4, 2011

    Tasty Tuesday! Cheesey chicken lasagna roll-ups!

    Hello friends, and a very happy Tuesday to you! There are some exciting things going on here at Scarlet Threads, and to start with, here's a great recipe for you to try! I don't know about you, but I am SO thrilled that the weather has finally cooled off. I am not a warm weather girl, and DC was just unbearable this summer. Today was about 50*! BLISS! I'm excited for cold weather recipes, like stews and roasts!

    For now, try this! Cheesey chicken lasagna roll-ups!

    Fun fact: when I was in elementary school, I had an imaginary friend that I called Cheesey. Yeah, I don't know either :)

    I found the recipe on pinterest, my new favorite site ever. I sort-of followed the recipe, but mostly made it up as I went along, as usual for me!

    Here's me and Lucy, preparing our chicken.

    Side note: do you have a Lucy in your collection? She's an oldie, but isn't she cute? I've heard rumors that Delicate Fortress has just a very few left, so if you love the looks of this sunshiny girl, head over to Delicate Fortress and snap one up!


    Cheesey chicken lasagna roll-ups

    ingredients:

    three large chicken breasts, cut into small pieces
    one-two jars of spagetti sauce, depending on how much sauce you like
    ten pieces of lasagna
    one package feta cheese
    one package parmesan cheese
    one container ricotta cheese
    whatever spices you like the best

    directions:

    1- boil water and cook lasagna

    2- cook chicken, adding whatever spices you like (I used LOTS of basil, onion flavor (I hate the actual onions, but like the flavor!) salt, pepper and garlic)

    3- once chicken is cooked through, put in bowl and add cheeses (I am very generous with the cheese!)

    note- the original recipe called for 1/2 cup milk, but I forgot that I had run out that morning, so didn't add any, and it was okay

    4- mix chicken and cheeses together, add more spices if you wish!

    5- pour half a jar of sauce into the bottom of a 9x13 baking dish

    6- take a piece of cooked lasagna, and place a spoonful of chicken mix, and roll up. place seam-side down in baking dish full of sauce. repeat until you use each piece of lasagna (you could obviously use less than ten pieces!)

    7- once all rolls are in dish, pour more sauce over it all, and add more sprinkled parmesan cheese (we like a lot of cheese!)

    8- bake at 375* for about 30 minutes until bubbly and delicious smelling!

    Then, enjoy

    (it may not be super pretty, but it was super good!)


    I totally love my babushka baking mitt :)
    I have a matching tea towel and mug!


    Another side note- see these placemats? They were my mother's, and she had them FOREVER. When I was a wee young thing, I thought they were the most beautiful placemats ever. There are matching napkins too! A few years ago, she wrapped them up for me one Christmas, and I was thrilled! Yes, I think they are nearly 30 years old :)

    What are you cooking this week? Send us the recipe, we'd love to feature you and your favorite Scarlet Threads apron!


    (this was cross-posted to Scarlet Threads blog, but I wanted to share it here too!)